Thursday, 4 May 2017

Completed: Classic Luzerne Trench Coat

Happy Me Made May everyone!

I am celebrating by having finished off my new favourite coat: the Luzerne Trench by Deer & Doe! I'll be writing this post in French as well as English, since Deer & Doe is a French company and I expect many people sewing this up will be francophone.

Je fête Me Made May aujourd'hui avec mon nouveau projet terminé : le trench Luzerne de Deer & Doe patrons! J'écris cet article en français aussi qu'en anglais car D&D est une compagnie française et je pense qu'il y aura beaucoup de gens français qui voudront coudre ce patron. Excusez mes fautes--j'ai plus l'habitude de parler ni écrire en français!

Trench Luzerne Trench

What a project this was! I am thrilled with the result, but I admit that about two thirds of the way through I was dragging my heels through the remaining steps. This make is long--there are bound buttonholes (which I'd never made before), bias-bound seams, hand-sewn hems, tons of topstitching and a long belt that took forever to turn right-side-out. But I prevailed in the end!

Quel projet compliqué! Je suis ravie avec le résultat, mais j'avoue que je me suis désespérée juste après avoir terminé la moitié des étapes. Ce patron est long à coudre--il y a des boutonnières passepoilées (un technique inconnu à moi), des coutures emballés en biais, des ourlets cousus à main, beaucoup de surpiqûres, et une ceinture très longue qui m'a pris une éternité à retourner. Mais au final, j'ai réussi!

Trench Luzerne Trench

Here's the back, showing off the pleat at the waist and the lovely back belt loop detail. The pleats in the skirt give this silhouette such a full and happy shape. I made my Luzerne in beige nonstretch cotton twill from Fabricland. It was on sale for $8 so I snatched up the end of the bolt! Warning: this coat uses a lot of fabric!

Voici le dos, où on peut voir le pli à la taille et le joli passant de ceinture au centre du dos. Les plis du Luzerne rend le manteau une silhouette très ample et gaie. J'ai construit mon Luzerne de tissu beige, un sergé sans élastique, acheté à Fabricland. Il était en solde à $8 le mètre, alors j'ai pris tout le reste du rouleau! Attention: ce patron utilise beaucoup de tissu!

Trench Luzerne Trench

Here you can see the inside of the jacket with some pretty floral bias tape I made from scratch using quilting cotton. I'd never made bias tape before, and although the process is pretty straightforward (especially with one of these handy helpers), it is lengthy.

Voici l'intérieur du manteau avec le ruban biais en fleurs rose que j'ai fabriqué moi-même avec un tissu en coton. C'était la première fois que j'ai fabriqué un ruban biais, et malgré la simplicité du processus, ça prend du temps!

Trench Luzerne Trench

If I make this jacket again, I will probably use store-bought bias tape, for two reasons. First, it's faster! Secondly, and this is likely just my choice of fabric, my bias tape ended up pretty thick, and my sewing machine really struggled to get over some of the seam intersections with multiple layers of fabric and bias tape. At one point, my machine literally stopped sewing and was just beeping at me in protest.

Si je construis un autre Luzerne, je pense que j'achèterais un biais préconstruit, pour deux raisons. Un, c'est plus vite! Deux, et c'est probablement la faute de ma choix de tissu ici, mon biais fini était bien épais, et ma machine à coudre avait du mal à passer sur les coutures de nombreuses couches.  Il y avait un moment où ma machine s'est arretée et ne bougeait plus à cause de l'épaisseur.

Trench Luzerne Trench

This was my first time sewing a Deer & Doe pattern, and I must say that it is beautifully drafted and everything fit together like a jigsaw puzzle. The sewing instructions were very bare-bones, so I did have to look up a few techniques, like how to bind seams with bias tape, but with the internet at my fingertips it wasn't too hard to find resources to help me with some of the steps I wasn't too sure about.

C'etait ma première expérience avec les patrons de Deer & Doe, et je suis très contente avec la qualité--tout les coutures s'alignent parfaitement. Les instructions pour la construction sont un peu maigre, donc je devais chercher sur internet comment faire quelques techniques, finir les coutures avec le biais, par example. Cela dit, c'était pas trop difficile de trouver des ressources pour m'aider.

Trench Luzerne Trench

The fit of this pattern was nearly perfect right off the bat, which was a happy surprise. My latest makes have both been from Sewaholic Patterns (my Minoru jacket and Granville shirts) and although I love the final products, both garments took a lot of pattern adjusting to fit my body properly. I was expecting to spend several days or even weeks tweaking the Luzerne pattern, but I was able to alter everything on one muslin in one evening and it fit like a dream.

La coupe de Luzerne me convient très bien--une bonne surprise! J'attendais passer des jours ou même des semaines à faire des ajustements au patron de base, mais j'ai presque rien trop changé!

Here are the changes I made:
  • lowered the waist by about 3/4"
  • raised the armscye for greater range of motion in the sleeves, and thereby shrunk it
  • did a full bicep adjustment on the sleeves
  • decreased the sleeve cap length to better fit my new armscye
  • lengthened the sleeves by about an inch
  • took a wedge out of the back skirt and centre back pieces at the waist, tapering to nothing at the top and bottom, to accommodate my swayback/back curvature--this worked a treat
  • lengthened the belt by about 8", since a few people who've already made Luzerne said it was a bit on the short side
  • lengthened the jacket overall by just drawing down to the length of the largest printed size
And that's it! I did not add the collar onto my muslin, and I really should have, because I think I need to slash and spread it a bit--it keeps rolling up, exposing the seamline underneath at the back, which is a sign the collar's outer edge is too small. I will adjust this next time.

Voici les changes que j'ai fait au patron:

  • j'ai descendu le niveau de la taille par 3/4"
  • j'ai remonté les emmanchures et les ai rétrécies pour améliorer l’amplitude du mouvement
  • j'ai augmenté la largeur des manches
  • j'ai réduit la longueur du haut des manches pour correspondre aux nouvelles emmanchures
  • j'ai rallongé les manches par environ une pouce
  • j'ai enlevé un coin (une cale?) au centre des pièces du centre dos et jupe dos au niveau de la taille, pour conformer à la courbure de mon dos
  • j'ai rallongé la longueur de la ceinture par 8", car quelques créatrices ont remarqué qu'elles la trouvaient un peu courte
  • j'ai rallongé la longueur du manteau total 
Et c'est tout! Pas de corrections difficiles. J'ai pas ajouté le col sur ma toile, et j'aurais dû le faire car au final je pense qu'il a besoin d'un réajustement. 

Trench Luzerne Trench

Here is a close up of the front of the jacket, where you can sort of see the bound buttonholes. The pockets in this pattern are big and deep and perfectly angled for plopping your hands right in. The welt edging on them looks super smart.

Voici le devant, où on peut voir un peu les boutonnières passepoilées. Les poches de Luzerne sont énormes et parfaitement placées pour y mettre les mains. La finition des poches est super chic aussi.

Trench Luzerne Trench

I added in one of my Dutch Label Shop tags to personalize the garment and also give it something to hang by, which I like to have in coats. I interfaced the inner facing and stitched it just to that, and as far as I can tell it is strong enough to do the job.

J'ai rajouté une étiquette de Dutch Label Shop pour personaliser le manteau et pour pouvoir le raccrocher. J'ai fusionné une triplure au revers de l'empiècement et j'ai cousu l'étiquette ici--c'est assez fort pour raccrocher le manteau, alors je suis contente.

Trench Luzerne Trench

In the photo above, you can kind of see the problem with the collar showing the underlying seam (though I did my best to pull it down for the photos). You can also see how the back yoke seam lines up perfectly with the sleeve seam--I love details like this! I actually ripped out one sleeve and re-sewed it because these seams were not lined up nicely enough for my liking.

La photo au-dessus montre un peu le problème avec le col--ça dévoile les coutures au-dessous. On peut voit ici aussi comment les coutures des manches s'alignent parfaitement avec les coutures de l'empiècement au dos--j'adore des détails comme ça! En fait j'ai recousu une des manches pour parfaire cet alignement.

Trench Luzerne Trench

Not everything went smoothly for me during this project. As I said above, my sewing machine protested at going over the thicker seams, especially when it came to topstitching. The topstitching thread was so thick, that even with my jeans needle, everything felt a bit tight and the stitches kept skipping over thicker areas.

I also had a problem with my inner yoke facing piece not lining up perfectly with the outer yoke piece, so on the inside, the line of stitching does not line up with the edge of the yoke and looks kind of weird. I took a crappy cell phone photo of this, so you can see what I mean:

Pas tout s'est bien passé avec ce projet. Comme j'ai dit, ma machine à coudre avait un peu de difficulté avec les coutures épaises, particulièrement avec les surpiqûres. L'empiècement à l'intérieur n'a pas bien correspondu avec celui de l'extérieur, alors la ligne de coudre n'est pas très beau à l'intérieur. J'ai pris une photo avec mon mobile (mauvaise qualité!) pour montrer cela:

Trench Luzerne Trench

These photos were taken at University College, on the campus of UofT. It's such a lovely old stone building and makes a great backdrop for photos. The weather has been horrible and rainy, but today was lovely so I wanted to take advantage while I could!

Ces photos étaient prises à University College, au campus de l'Université de Toronto. C'est un bel immeuble en pierre et ça marche bien comme arrière-plan pour des photos! Ces derniers jours, le temps à Toronto ne faisait pas trop beau, alors il fallait m'en profiter du soleil aujourd'hui!

Trench Luzerne Trench

Overall, I am beyond happy with this coat. I've been lacking a nice, basic piece like this and I was overjoyed when Deer & Doe released this pattern. It really is the loveliest silhouette and so worth it in the end, even though it's a big project.

Au final, je suis plus que ravie avec ce monteau. Je manquais un manteau joli et classique comme cela et quand j'ai vu le patron au début, je savais que j'en avais besoin! Vraiment la silhouette est trop flatteuse et ça vaut la peine de le fabriquer, même si c'est long à faire.

Tuesday, 25 April 2017

Completed: Modified Jean Granville

Jean Granville Shirt
Okay, so this shirt is not actually denim, but it was with the jean fabrics at the store and it has that look to it, so I went with it. It's a very lightweight, loosely woven cotton with little white flowers in a diagonal pattern all over it, and it is adorable.

Jean Granville Shirt

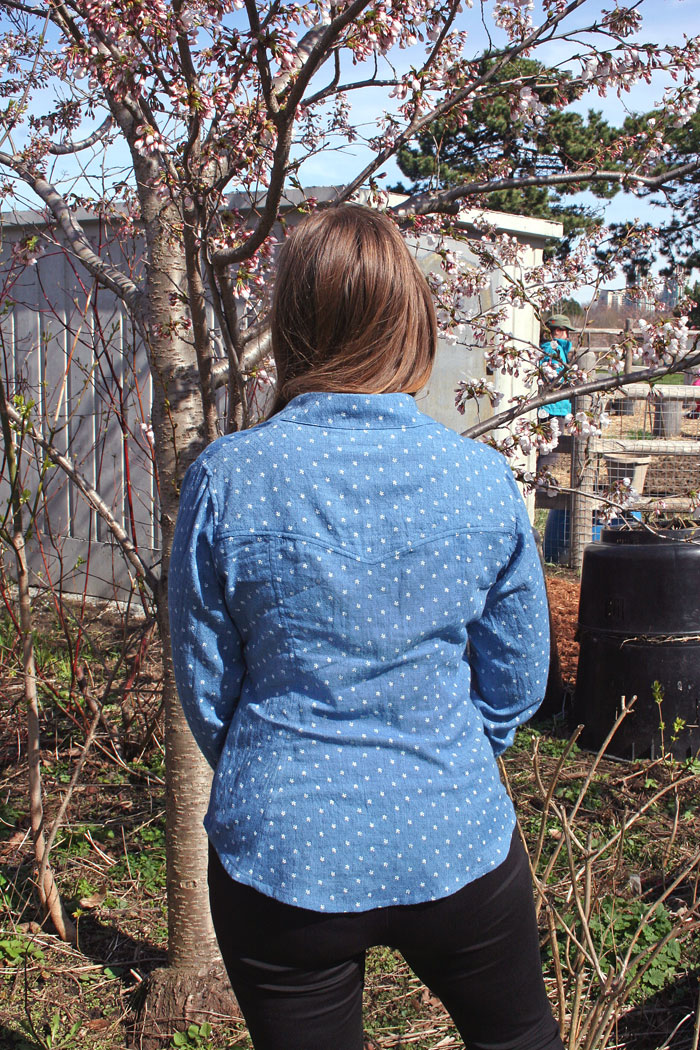
For this shirt, I used my Sewaholic Granville base and altered the yoke to give it a pointed/heart-shaped/western look. It was a little tricky sewing it up with the facing and doing the whole "burrito" method thing, but doable by clipping into the seam allowance at the point.

Jean Granville Shirt

I really love how this shirt turned out! It is so comfy, breathable and the colour goes well with my eyes, which are a dark blue as well. I think I may continue to tweak the Granville pattern--I think it flares out a little too much over my rear, visible in the above photo.

Jean Granville Shirt
Here I am with my trusty bicycle who gets me around town, rain or shine. In the background you can see a cherry tree starting to bloom. This year in Toronto is a good one for cherry blossoms!

Cherry Blossoms
They are so pretty ✿✿✿✿✿

Jean Granville Shirt

I sewed up this shirt in 14 hours straight last weekend. It would have taken less time but I totally messed up the sleeves! First I sewed them on the wrong sides, and when I tried on the shirt the cuff plackets were on the tops of my forearms. I was so close to being done I wondered if I could live with it, but decided in the end to do things right so I unpicked those seams. I really, really hate sewing set-in sleeves so it took a lot of willpower to convince myself to do them over again.

Then, when I sewed them on the *right* sides, wouldn't you know I went and attached one of them in the wrong orientation! This time when I tried it on, one sleeve was tight and pulling in the most unflattering way and it turns out I had aligned the undersleeve seam with my back yoke seam instead of my side seam on the bodice! I despaired and then unpicked this sleeve a second time and set it in for the third and final time, correctly. What a disaster!

Jean Granville Shirt

Anyway it all worked out in the end and I am very pleased with this shirt. This is the first time I've sewn the version of the Granville with front pockets, and they turned out well. One is ever so slightly higher than the other, which you can see in the above photo, but you don't really notice when I'm just wearing it around with the top buttons undone. I used this clever trick to get my pockets to be the identical shape and size as each other.

Jean Granville Shirt

Here is my adorable label from the Dutch Label Shop sewn to the inner back yoke. I just love these! They really help make home-sewn garments feel professional and complete.

Jean Granville Shirt
Here's a closeup of my cuffs and placket. These ones turned out really well. I'm thinking of adding a second smaller button further up on the placket since they are long and it will help keep them together better.

Jean Granville Shirt Overall, another make I'm very happy with! This Granville pattern is taking me pretty far! Happy Spring, everyone :)

Tuesday, 18 April 2017

Completed: Summer Ruffle Blouse

The weather here is finally starting to sunny up, so I've started thinking about warm-weather sewing. I picked up a bunch of lightweight fabrics for such a thing and one was this lovely rayon with a yellow floral pattern on a white background. It's so drapey and smooth and a dream to wear--but a nightmare to sew!


I wanted to do something a bit different than my go-to standard Granville pattern for this fabric, and I was intrigued by some ruffle shirt patterns I've seen around, like the Suzon by République du Chiffon and Simplicity 4122. However, both these patterns seem to be a boxier cut than I like to wear, so I thought I'd try to replicate the ruffle feature and hack it onto my Granville base, which fits me well in the bodice.


It wasn't too hard to draft a semi-circular front and back yoke to fit, but the rounded neckline was a bit more of a challenge. I ended up with a horseshoe-shaped pattern piece which was super shifty to sew, so even though as drafted it's supposed to be a 1-inch width all the way around, the final collar ranges from 3/4 inch to 1.5 inches at different points along. Oops. I think it still looks fine, but if I make another one of these I will try starching my fabric before sewing to see if that helps with the shiftiness! The neckline bit is kind of like a curved mandarin collar, or just a collar stand. I used this tutorial to help me sew it up properly.


This was my first time sewing French seams, and I think the effect is really good with the lightweight rayon. They do take some time to do--trimming all my seam allowances down to 1/8 inch was terrifying with such a fray-happy fabric! But it worked out in the end. I did manage to sew one sleeve the wrong way round and have to unpick it, thanks to my ingrained impulse to sew with right sides together. That's a hard habit to break.

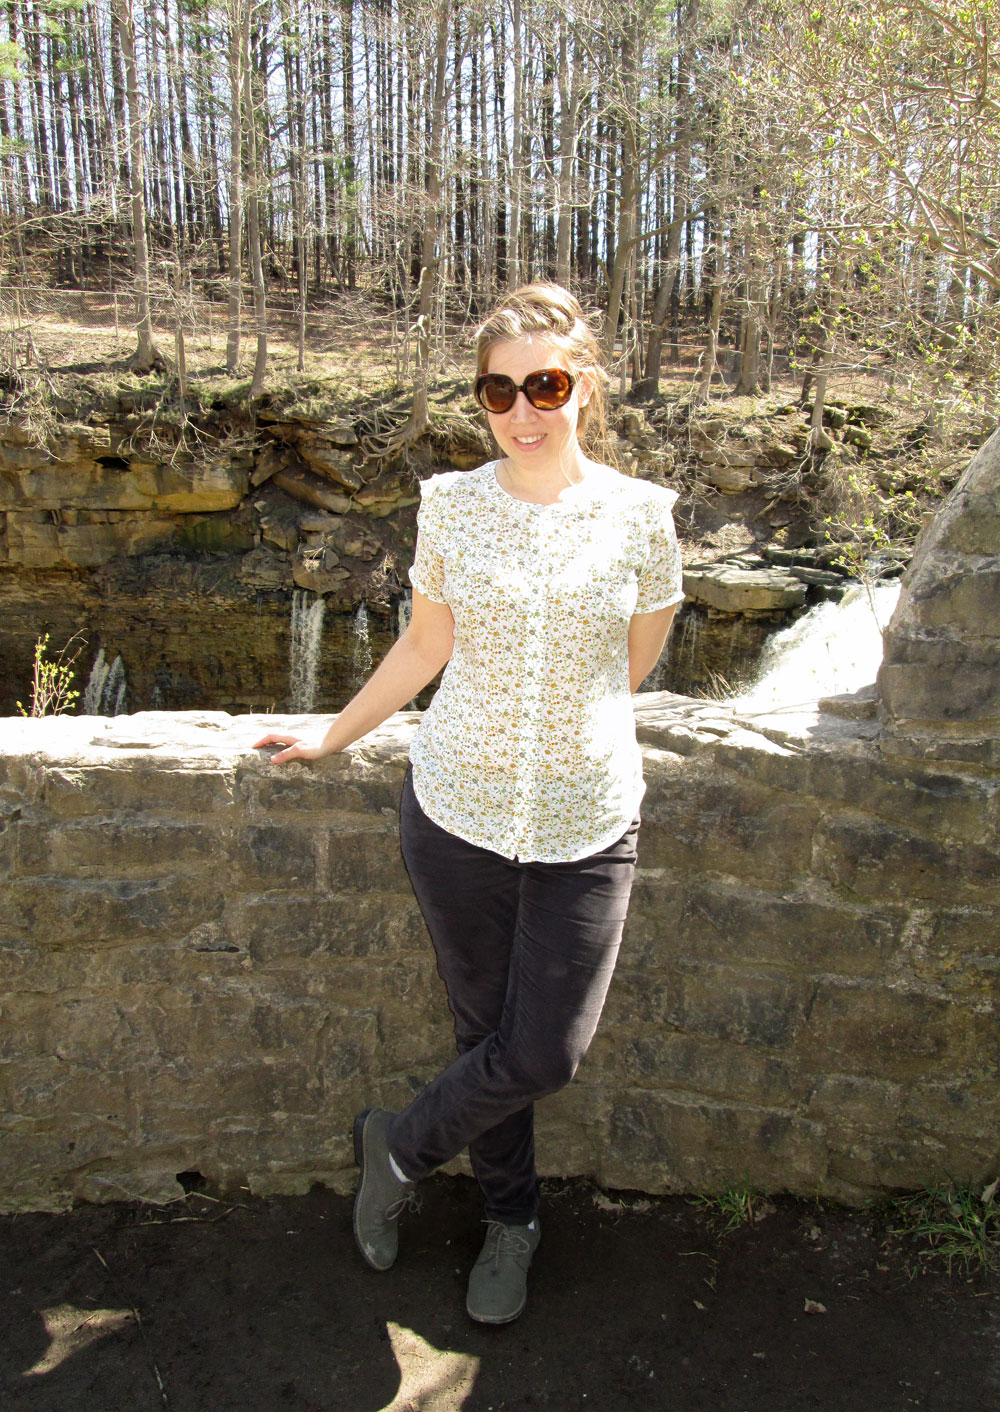
These photos were taken on a family hike through Ball's Falls Conservation Area in Ontario, which has got to be the most hilariously-named conservation area. Let me know if you can think of another contender.

Ruffle Shirt

It wasn't really that warm out, but it was sunny, so I froze a little to get some pics for the blog. Unfortunately, a lot of them are pretty blown out--the camera used wasn't the best and it was so darn bright, and the shirt is white. Altogether not the best mix for stellar photography.


Here you can see how the ruffle goes over the shoulder to connect to the back yoke. The ruffle pattern piece ended up being 110 inches long (twice the width of my fabric) and scrunched into a 44-inch length to fit around my two curved yokes. Longer than I expected it would be!


I try to avoid selfies on this blog, but with this camera they seem to have better detail than the ones taken from further back. Here you can see the ruffle a bit better, and the floral pattern of the rayon.


I didn't want to go through the trouble of making sleeve plackets and cuffs with this fabric, so I played it safe and drafted little short sleeves for this blouse, and just double turned up the hem. It kind of flares out at the sleeve hem, though, so I might go back and finish the sleeves differently.


There are the lower falls in the background! They are much bigger in the spring when all the winter ice melts. We came here last fall and there was barely a trickle!


One final selfie for fun :)

Wednesday, 15 March 2017

Completed: Sewaholic Granville Shirt

OMG I finally have a collared shirt that actually fits me!

Sewaholic Granville shirtThis is a big deal! Whenever I buy ready-to-wear clothes, I almost always end up choosing stretch garments, because I've got, uh, curves all over the place. Collared shirts have been my nemesis for a long time because they're usually non-stretch and never drafted for anything larger than a B cup. So if I fit my bust, the rest of the shirt hangs loose like a tent. If I fit my waist, it won't do up over my bust (or if it will, it pulls and gapes open). And, no matter the size, the sleeves are always too damn tight over my upper arms. So, for a long time, I just decided that I can't pull off the more professional look of a collared shirt.

Sewaholic Granville shirt

Enter: Sewaholic's Granville shirt. I'd had my eye on this pattern a while, and finally got around to giving it a shot. The actual construction of the garment is not too complicated--as long as you take things slow. It helped that I had already made Thread Theory's Fairfield shirt for my boyfriend, because they have a very detailed sewalong that goes into detail about finishing your shirt with flat-felled seams, which I did here as well. They also have some great info about buttonhole placement, and I definitely need to get my hands on an expanding gauge if I'm going to make a habit out of sewing button-down shirts!

Sewaholic Granville shirt

This shirt has gotten a lot of wear since I finished it. It may be my favourite thing I've ever sewn for myself. I really took my time with the pattern alteration--I made three bodice muslins and one wearable muslin out of flower power quilting cotton before using this "good" fabric (this fabric is just some cotton/poly blend with a slight two-way stretch from Fabricland...it feels and looks lovely but it's not really that high quality).

Sewaholic Granville shirt

I did change the pattern an awful lot from the original--I've sort of resigned myself to the fact that nothing is ever really going to fit me right out of the box. Here are the changes I made:
  • Took in the side seams at the hip. Like a LOT. Sewaholic's block is for pear-shaped women, but it seems like the flare is especially prominent at the hips--my first muslin was all kinds of awful, with not enough room in the back for my booty and way too much fabric at the side, like I had hip wings. Not a good look.
  • Did a minimal full bust adjustment for some extra shaping in that area.
  • Played around with the armscye to make it quite a bit higher and smaller to conform to my proportions better--this ended up increasing my bust dart quite a bit since I rotated some of the armscye length into the dart to get rid of it. 
  • Did a full bicep adjustment to the sleeve because I have quite a large upper arm circumference. Finally, sleeves that fit!
  • For some reason, the size 12 collar was waaaaaay too big on me when I made my wearable muslin. I could fit a whole fist beside my neck when the shirt was done up. So for this version I used the size 6(!) collar and collar stand and hacked the front panels and yoke neckline to fit it, mostly by just bringing the yoke neckline up to make the total seamline smaller. 
  • I added a pleat to my sleeve near the cuff since the cuff piece was too small to match the sleeve hem. I like this little pleat, but I must be doing something wrong when sewing the placket, since the instructions don't mention a pleat here at all.
  • I took in the waist at the back princess seams a LOT and added quite a bit to the side back and centre back panels to flare out over my prominent derrière. Look at the difference in these two pattern pieces:
The original centre back pattern piece is on the left; my altered pattern is on the right. The side back piece was also taken in at the waist, and the flare at the hip was transferred to the backside.
Here is a close up of my cuffs, where you can see the pleat I added in. The plackets were a bit of a pain, but they turned out okay.
Sewaholic Granville shirt

I found some lovely coral buttons to go with this shirt, and even though they are larger than the pattern calls for, I bought them anyway because I think they're perfect for the job


These photos were taken at the Botanical Gardens in Montréal last weekend. It was something ridiculous like -17 plus wind chill outside, so this was a warm place to hang out that served as a lovely backdrop for some blog pics!

Sewaholic Granville shirt

Check out those back princess seams! No pooling fabric at my waist! This is another problem I have with RTW clothing, and also a problem I had with the Granville sewn up with no modifications. It really, really pays off to make a muslin and fit patterns to your body.  The more I make, the better I'm getting at this skill and it's very rewarding.

Sewaholic Granville shirt

Things I'll improve for next time:
  • I redrafted the collar and collar stand for my next Granville to be more curved, because I find the back of this collar stands up away from my neck, rather than conforming to it, and I don't like the gap. I'm in the middle of sewing another wearable muslin to incorporate these changes, and the ones below.
  • I think I made the sleeves a tad too large--they were trouble to ease in. I will scale them back a bit.
  • I would like the bottom of the yoke to hit me a bit lower on my back, so I will transfer some height from the back and side back pieces to the bottom of the yoke--maybe 3/4 inch.
  • I may shorten the hem by a teeny tiny bit, as I find the shirt a bit long right at the front. 
Other than that, I am more than happy with this pattern, and I've already bought some actual nice fabric--Kaufman London Calling cotton lawn!--for my next two Granvilles :) I have a feeling this will be a TNT pattern for me once I tweak it just a little bit more.

I don't know why, but I just love this twisted gnarly branch. Plants are so cool.

Monday, 26 September 2016

Completed: My Minoru Jacket!

She's finally finished!

I'd had my eye on the Minoru Jacket pattern by Sewaholic for well over a year before actually making the purchase. But I sure am glad I did!

Warning: photo overload ahead! I just love all these pics

Minoru jacket

This is one of the most involved sewing projects I've completed, and I really took my time with it. No cutting corners--I spent my time shopping for the right fabric, pre-washing and drying, ironing, planning out all the details (especially the modifications I wanted to make to the pattern) and cutting out the fabric with care. I can be a bit of a rusher when it comes to sewing, and I didn't want to make any silly, preventable mistakes with this one. My hard work paid off!

Minoru jacket

My outer fabric is a medium-weight navy cotton twill, and my lining is a very soft red, white and navy plaid flannel. Even though neither fabric is particularly thick, the finished jacket is super warm! The sleeves are lined in a slinky polka dot fabric I had lying around--probably polyester, but I'm not 100% sure. I sewed a size 12, grading up to a 14 for the sleeves and down to a 10 for the hips.

Minoru jacket

Here's the back of the jacket, where you can see the hood all zipped into the Minoru's main feature: the zippered collar pocket! I lined my hood, so when I stuff it in the collar it becomes quite the sturdy neck pillow.

Minoru jacket

I love the high collar on this jacket so much! It comes up to my nose and because I used the flannel on the inner collar, it's super soft and warm against my face. Also I can look like a snoopy suspicious spy.

Minoru jacket


I am very grateful for all the Minoru-sewers before me who blogged about their experiences and helped to inspire my jacket and all the changes I made. My colour scheme was heavily influenced by Sallie Oh's gorgeous Minoru. I used Rocket Sews' advice for adding a zipper wind guard. I redrafted the hood from a two-piece to a three-piece using this tutorial from Notes From a Mad Housewife. My pockets were inspired by the shape of Tikismikis' ones. I added a second lining to my collar to completely enclose the hood and hide away all of the raw edges, as Spiffy Stitches instructs here. And Lladybird's beautiful jacket was the one that made me decide once and for all to purchase the pattern!

Minoru jacket

Here's a list of all the changes I made to the pattern:
  • Lined the hood
  • Added a drawstring to the hood
  • Fully enclosed the hood in the collar, hiding the raw edges
  • Redrafted the collar to a 3-piece version for better shaping
  • Added front pockets with a gold snap closure
  • Used a two-way separating zipper for ease of wearing while cycling
  • Changed the cuffs to straight ones instead of elastic gathered ones
  • Used the lining fabric for the inner pockets and inner collar
  • Added a zipper wind guard behind the zipper
  • Lengthened the whole jacket by 2 inches
  • Shortened the sleeves by 2 inches
  • Narrowed the hips by about 2 inches, though I wish I'd kept the jacket wider here 
And I think that's it!

Minoru jacket

My lovely chéri Oliver was kind enough to take these photos for me to show off all sides of my Minoru :) We walked through the Liberty Village neighbourhood of Toronto and discovered some lovely backdrops for photos, like this cat and coffee graffiti mural.

Minoru jacket

Here you can see the inside of the jacket in all its warm flannel glory. Look at that plaid matching on the inner pockets!

Minoru jacket

I also added a label on the centre back of the lining in navy velvet, mostly just as an excuse to use the lettering and decorative stitch functions on my sewing machine. It's kind of corny but hey, at least no one can steal my jacket! Here you can also see the hanging loop, which is such a smart feature of this pattern.

Minoru jacket

Here is me fake-reaching into my inside pockets. I was carrying around extra memory cards in there, though!

Minoru jacket

Side view with my massive hood up, also showing off the cinched elastic waistband which gives this coat lovely shaping.

Minoru jacket

Hands in my big warm outer pockets. I drafted these by marking a natural placement for my hands to sit on the jacket front pieces and slicing along those lines, leaving the bottom the same shape as the jacket front. The pockets are lined in the plaid flannel and understitched so the lining won't roll out, and they have a gold snap closure to make sure they don't bag away from the jacket. I basted the pockets to the jacket front pieces and used them all as one piece in the actual jacket construction.

Minoru jacket

Now, because I made the pockets very early on in the sewing process (before the jacket front pieces are sewn to the sleeves), I didn't account for the 2 ⅝ inch hem to be turned up at the bottom. Once I had constructed the outer shell and read ahead a bit in the instructions, I realized that if I turned up my jacket by that much, my pockets would end up way to shallow for my liking. So, I had to lengthen the whole thing by that amount, by adding a band facing along the inner bottom of the coat and lengthening all the lining body pieces. Luckily, I hadn't cut out my lining pieces at this point, so I didn't waste any fabric. For the inner bottom band, I basically traced the back and jacket front pieces along the bottom to create a strip that mimicked the angles of the sewn body, and made the band 3 ¼ inches tall (2 ⅝ inch for the original amount to turn up, plus ⅝ inch seam allowance along the bottom). I sewed this band to the constructed jacket shell along the bottom, right sides together, and understitched it to keep it from rolling out. 

Minoru jacket

Because I lengthened the whole jacket, the original zipper I had bought (which was only a one-way separating zipper) was now way too short for the front closure. Unfortunately, out of 11 fabric stores I went to in the city, none carried a long enough zipper with gold teeth on a navy tape. I bought a gold-on-black one, but when I brought it home it looked awful next to the navy. So I had to order in a 34 inch double-separating gold zipper on navy tape from Zipper Shipper. It took a while to get here (thanks, Canada Customs) and was a lot pricier than my original zipper(s), but in the end it was well worth it--it's the perfect colour and length, and I love the double-separating feature. Zipper win!

Minoru jacket

I used a triple straight stitch for all the topstitching, which made sewing slow but it looked a lot better than a regular straight stitch. I didn't buy special topstitching thread, either, although I did buy a 1 km spool of navy thread for this, since a lot of you who've sewn this before said this project uses tons of thread! Maybe 1 km was a little excessive, since I've got most of that spool remaining.

Minoru jacket

In terms of the actual construction, I found the project very straightforward, though time-consuming. The Minoru Sew-Along was a big help, and I pretty much used that instead of following the booklet instructions. It was really exciting to have a completed hood and completed outer pockets pretty much right at the beginning of sewing--a big motivator to actually finish the project!

Minoru jacket

Here's that wonderful chéri of mine posing with me in a little factory courtyard (wearing the Finlayson sweater by Thread Theory that I made for him last Christmas! I'll write up another post to show off that make.)

Minoru jacket

And I think that's it! I'm so very pleased with the result, and there are only a very few minor issues I encountered along the way.

Things I'd do differently next time: I'd interface the collar with something a bit stiffer--I find it accordion folds down on itself instead of standing up stiff and tall the way I like, so I have to pull it up a lot.

I'd also not sewn with flannel much before this, and holy moly is it a warpy fabric! The angles kept skewing no matter how much pinning I did, so I think the next time I use flannel I will lightly interface the whole fabric to keep things square and prevent any shifting. I did a pretty good job of pattern matching the plaid, but toward the bottom of the coat things got a bit wonky with the horizontal stripes not lining up perfectly with the bottom edge. It's not a huge deal, but could probably be avoided with some interfacing or fabric starch or something.

I would also add back the 2 inches I took out of the hips of this jacket--while it isn't exactly snug, I prefer a bit more room for the booty in my jackets. Guess I'm more pear-shaped than I think!

Minoru jacket

I love this pattern, and I plan to make another minoru at some point, maybe next year. I'm thinking something warmer and more parka-like. This pattern is so versatile!

Thanks for reading :)